The Honeywell RTH6580WF is a Wi-Fi-enabled, 7-day programmable thermostat designed for smart home integration. It offers user-friendly scheduling and energy-saving features, making it ideal for modern households. With remote access capabilities and a sleek design, this thermostat provides precise temperature control and enhanced convenience. This guide will walk you through its installation, configuration, and advanced features to maximize efficiency and comfort.
1.1 Overview of the RTH6580WF Model
The Honeywell RTH6580WF is a Wi-Fi-enabled, 7-day programmable thermostat designed for smart home integration. It features a color touchscreen display and compatibility with various heating and cooling systems. This model offers remote access via Honeywell’s app, allowing users to control settings from anywhere. Its energy-efficient design and programmable scheduling help reduce energy consumption. With geofencing capabilities and smart alerts, the RTH6580WF ensures optimal comfort and convenience, making it a versatile choice for modern homes.
1.2 Key Features and Benefits
The Honeywell RTH6580WF offers a color touchscreen display for easy navigation and a Wi-Fi connection for remote control via Honeywell’s app. It features 7-day programmability, allowing users to customize temperature settings for energy efficiency. The thermostat supports geofencing and smart home integration, enhancing convenience. Its energy-saving mode and auto-changeover between heating and cooling ensure optimal performance. With compatibility with most HVAC systems and a user-friendly interface, this thermostat provides precision temperature control and enhanced comfort for modern homes.
Pre-Installation Steps
Ensure system compatibility and gather tools like a Phillips screwdriver, pencil, and level. Prepare the installation site by turning off power to the HVAC system for safety.
2.1 Checking System Compatibility
Before installation, verify that the Honeywell RTH6580WF is compatible with your HVAC system. Check your system’s voltage requirements and ensure it matches the thermostat’s specifications. Refer to your HVAC system’s manual to confirm compatibility with heat pumps, furnaces, or air conditioning units; Verify the number of stages your system supports and ensure the thermostat can handle it. This step prevents installation issues and ensures proper functionality.
2.2 Gathering Necessary Tools and Materials
To ensure a smooth installation, gather the required tools and materials beforehand. You will need a No. 2 Phillips screwdriver, a small pocket screwdriver, a pencil, and a level for proper alignment. Additionally, prepare the anchors and screws provided with the thermostat. If your walls are uneven or require extra support, have drywall anchors ready. Organize all components and tools in a accessible location to avoid delays during the process. Proper preparation ensures a hassle-free installation experience.
2.3 Preparing the Installation Site
Begin by clearing the area around your old thermostat to ensure easy access. Clean the wall surface to remove dirt or old adhesive, ensuring a secure fit for the new wallplate. Use a level to mark the wall for proper alignment. If replacing an old thermostat, carefully remove it and set aside the wires. Turn off the power to your HVAC system at the circuit breaker before starting. Having a pencil handy will help mark wire positions. Ensure all materials are within reach to streamline the process.
Installation Process
Install your Honeywell RTH6580WF thermostat by mounting the wallplate, connecting wires, and securing the unit. Ensure all connections are tight for proper system operation and comfort.
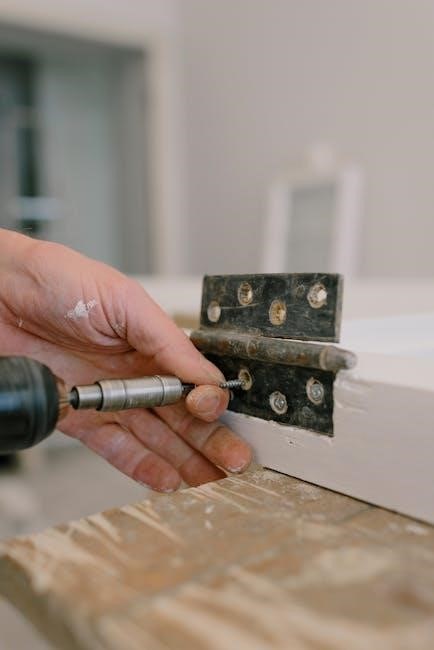
3.1 Mounting the Wallplate
Mount the wallplate using the provided screws and anchors. Ensure it is level for proper installation. Turn off power before starting. Follow the manual for precise steps to secure the wallplate firmly, ensuring stability for the thermostat. This step ensures a solid base for the unit, promoting reliable operation and longevity of the device. Proper alignment is crucial for accurate temperature sensing and control. Make sure the wallplate is flush with the wall for a clean finish. Refer to the manual for specific screw placements and torque recommendations to avoid damaging the wall or the product. Ensure the wallplate is securely fastened to handle the weight of the thermostat without shifting or loosening over time. This foundational step is essential for the overall functionality and aesthetics of the Honeywell RTH6580WF thermostat.
3.2 Connecting the Wiring
Connect the wiring to the wallplate terminals, ensuring power is off at the circuit breaker. Use a screwdriver to secure the wires to the correct terminals, matching the labels from your old thermostat. Strip wire ends if necessary. Refer to the manual for specific terminal assignments. Gently tighten the screws to avoid damaging the wires. Double-check connections for accuracy. Use a voltage tester to confirm no power is present before proceeding. Proper wiring ensures safe and reliable thermostat operation.
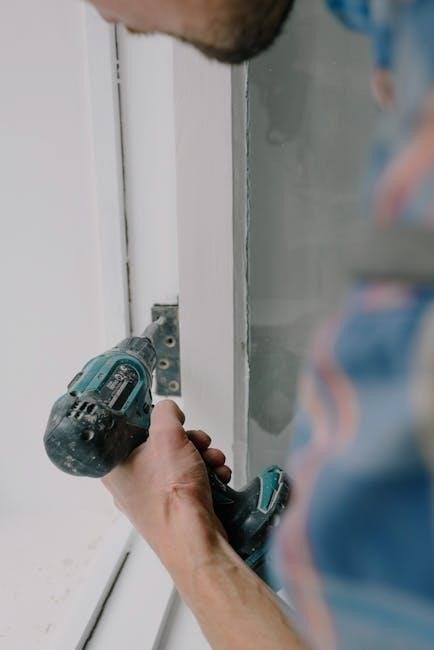
3.3 Installing the Thermostat Unit
Mount the thermostat unit to the wallplate using the provided screws. Ensure the unit is level and securely fastened. Align the thermostat with the wallplate tabs, then gently press it into place until it clicks. Use a screwdriver to tighten the screws firmly. Double-check the alignment and ensure the display is facing upright. Once installed, turn the power back on at the circuit breaker. Press the display to verify it powers up and begins the setup process. Proper installation ensures smooth operation and accurate temperature control.

Wi-Fi Setup and Registration
Connect the thermostat to your home Wi-Fi network by selecting it from the available options and entering the password. Once connected, register the device online to enable remote access and monitoring through the Honeywell app. This step ensures seamless control and energy management from your smartphone or tablet, enhancing convenience and efficiency.
4.1 Connecting to Your Home Wi-Fi Network
To connect your Honeywell RTH6580WF thermostat to your home Wi-Fi network, navigate to the Wi-Fi setup menu on the device. Select your network from the list of available options and enter your password when prompted. Ensure your router is nearby for a stable connection. Once connected, the thermostat will confirm the link. If prompted, restart the device to complete the process. A successful connection allows for remote access and smart home integration through the Honeywell app.
4.2 Registering the Thermostat for Remote Access
After connecting to Wi-Fi, register your Honeywell RTH6580WF thermostat for remote access. Download the Honeywell Home app and create an account. Follow the in-app instructions to link your thermostat by entering the unique serial number or scanning the QR code. Registration ensures remote control and access to advanced features. Once registered, you can adjust settings, view energy usage, and receive alerts through the app. This step is essential for full smart functionality and seamless integration with your smart home system.

Programming and Configuration
Programming the Honeywell RTH6580WF allows you to set a weekly schedule and customize temperature settings for optimal comfort and energy savings. The thermostat offers flexible scheduling and smart alerts to ensure efficient operation. Users can adjust settings manually or through the app, making it easy to tailor the system to their lifestyle. This section focuses on configuring these features to maximize performance and convenience, ensuring a seamless experience for homeowners.
5.1 Setting Up a Weekly Schedule
Setting up a weekly schedule on the Honeywell RTH6580WF allows you to customize temperature settings for each day of the week. The thermostat is preprogrammed with a default schedule, but you can adjust it to fit your lifestyle. Simply navigate to the scheduling menu, select the desired day, and choose the appropriate temperature settings for different times. This feature ensures consistent comfort and energy efficiency. By tailoring the schedule to your daily routine, you can optimize heating and cooling usage, reducing energy waste and lowering utility bills.
5.2 Adjusting Temperature Settings
Adjusting temperature settings on the Honeywell RTH6580WF is straightforward. Use the touchscreen interface to set your preferred temperature for current or future periods. The thermostat allows you to adjust settings in 1-degree increments, ensuring precise control. You can also use the Honeywell Home app to change temperatures remotely. For temporary adjustments, the Hold feature lets you override the schedule without altering it permanently. This flexibility helps maintain comfort while optimizing energy usage. Regularly reviewing and adjusting settings can lead to significant energy savings over time.
5.3 Enabling Energy-Saving Features
The Honeywell RTH6580WF offers advanced energy-saving features to optimize your heating and cooling usage. Enable smart recovery to pre-cool or pre-heat your home, reducing unnecessary energy use. The geofencing feature adjusts temperatures based on your location, ensuring efficiency when you’re away. Additionally, the thermostat provides energy usage reports to track your consumption and identify savings opportunities. By enabling these features, you can significantly reduce your energy bills while maintaining a comfortable home environment. Regularly review and adjust settings to maximize efficiency.

Advanced Features and Customization
The Honeywell RTH6580WF offers smart home integration with voice commands and customizable display settings. It also allows custom actions and scenes for enhanced control.
6.1 Using Smart Home Integration
The Honeywell RTH6580WF seamlessly integrates with smart home systems, allowing voice control via Amazon Alexa and Google Assistant. Users can easily connect their thermostat to smart hubs and control it through smartphone apps. This integration enables customizable scenes and automated temperature adjustments, enhancing comfort and energy efficiency. By linking with other smart devices, the RTH6580WF becomes a central part of a connected home, offering remote monitoring and voice-activated commands for ultimate convenience.
6.2 Customizing Notifications and Alerts
The Honeywell RTH6580WF allows users to customize notifications and alerts for enhanced convenience. Receive temperature change alerts, system status updates, and maintenance reminders directly on your smartphone. These notifications ensure your home stays comfortable and energy-efficient. Users can enable or disable alerts based on their preferences and adjust notification types to suit their lifestyle. By setting up these alerts through the Honeywell Home app, you can stay informed and respond promptly to system needs, ensuring optimal performance and peace of mind.

Troubleshooting Common Issues
This section covers common issues like display malfunctions or Wi-Fi disconnections. Troubleshoot by restarting the thermostat, checking wiring, or consulting the user manual for solutions. For persistent problems, contact Honeywell support for assistance;
7.1 Resolving Wi-Fi Connectivity Problems
If your Honeywell RTH6580WF thermostat loses Wi-Fi connection, restart the device and router. Ensure your network password is correct and the thermostat is connected to the right network. Check for firmware updates, as outdated software can cause connectivity issues. If problems persist, reset the thermostat to factory settings or consult the user manual for advanced troubleshooting steps. For further assistance, contact Honeywell support or refer to the installation guide.
7.2 Addressing Display or Sensor Issues
If the display is unresponsive or sensors malfunction, ensure the thermostat is properly powered. Clean the display gently with a soft cloth to remove dirt or smudges. Check sensor accuracy by comparing readings with another device. If issues persist, recalibrate the sensors via the settings menu; For display problems, restart the thermostat or perform a factory reset. Consult the user manual for detailed calibration steps or contact Honeywell support for further assistance. Regular maintenance can prevent such issues.

Maintenance and Upkeep
Regularly clean the thermostat to ensure optimal performance. Check and update firmware to maintain functionality and security. Schedule periodic checks to ensure accurate temperature control.
8.1 Cleaning the Thermostat
To maintain your Honeywell RTH6580WF thermostat’s efficiency, regular cleaning is essential. Power off the device before cleaning to avoid any electrical issues. Use a soft, dry cloth to wipe down the exterior, gently removing any dust or debris. For stubborn stains, a slightly damp cloth can be used, but ensure no moisture seeps inside. Avoid harsh chemicals or abrasive cleaners, as they may damage the screen or internal components. Regularly cleaning the thermostat ensures accurate temperature readings and optimal performance. Additionally, check and clean the sensors and vents to maintain proper airflow and functionality.
8.2 Updating Firmware
Regular firmware updates ensure your Honeywell RTH6580WF thermostat operates with the latest features and improvements. To update, first, ensure the thermostat is connected to your Wi-Fi network. Access the Honeywell Home app, navigate to the thermostat settings, and check for available updates. If an update is found, select “Update” and wait for the process to complete. The thermostat will restart automatically. Always follow the on-screen instructions carefully to avoid interruptions. Keeping the firmware up to date enhances performance, security, and compatibility with smart home systems.
Safety Precautions
Follow electrical safety guidelines to avoid shocks or damage. Ensure proper installation to prevent radio frequency interference. Always disconnect power before servicing the thermostat.
9.1 Electrical Safety Guidelines
Always disconnect power before installing or servicing the thermostat to avoid electrical shocks. Ensure proper grounding and follow local electrical codes. Use approved wiring methods to prevent fire hazards. Avoid exposing the device to water or excessive moisture. Keep the thermostat away from direct sunlight and heat sources. Never modify the thermostat’s electrical components, as this could cause radio frequency interference or safety risks. Follow all instructions carefully to ensure safe and reliable operation of the Honeywell RTH6580WF thermostat.
9.2 Proper Disposal of Old Thermostat
When replacing your old thermostat, ensure environmentally responsible disposal. Check local regulations or recycling centers for proper handling of electronic waste. Some components, like batteries, may contain hazardous materials and require special disposal. Do not dispose of the thermostat in regular trash if recycling options are available. Many retailers or municipalities offer e-waste collection programs to safely recycle thermostats. Proper disposal helps protect the environment and adheres to local laws and guidelines.
With the Honeywell RTH6580WF installed, enjoy enhanced comfort and energy efficiency. This thermostat simplifies temperature control and offers smart features for a modern home experience.
10.1 Final Check and Verification
After completing the installation, perform a final check to ensure all components are securely connected. Verify the wallplate is properly mounted, wiring is correctly connected, and the thermostat is functioning. Test temperature adjustments, scheduling, and remote access to confirm everything works seamlessly. Check for any error messages and ensure the display is responsive. Verify Wi-Fi connectivity and smart home integrations are operational. Review energy-saving settings to ensure they align with your preferences. This final verification ensures your Honeywell RTH6580WF is installed correctly and ready for optimal performance.
10.2 Enjoying Your Newly Installed Thermostat
With your Honeywell RTH6580WF thermostat installed, you can now enjoy enhanced comfort and convenience. Easily manage your home’s temperature with the intuitive touchscreen or remote access via your smartphone. Take advantage of programmable scheduling to optimize energy usage and reduce utility bills. Explore smart home integrations for seamless control with other devices. Relax knowing your system is running efficiently, and make adjustments as needed to suit your lifestyle. This thermostat is designed to provide long-term savings, reliability, and a modern, user-friendly experience for your home’s heating and cooling needs.